Create Vintage T-Shirt Design Textures
Are you taking advantage of the vintage t-shirts trend? Learn how to create your very own Vintage T-Shirt Design Textures with out latest tutorial.
Boost your potential sales & business profits with our vintage t-shirt design texture tutorial video. In this latest tutorial, we will show you how to create your very own vintage effects, for your next t-shirt design collection.
For this video, we’ve taken the tools and equipment we have around us and combined them to create some pretty amazing looking vintage t-shirt design textures.
The visual appeal of vintage T-shirts has a unique quality. It all ties into the tactile sense of physically connecting to another time and place, which is important. People want a feeling of belonging to a movement or an era. A cracked graphic can feel like this look gives it personality rather than making it look damaged and not really sellable.
What You’ll Learn:
- Why use Vintage Texture in T-Shirt Designs
- What are Vintage Textures
- Why Flex-Soft (No-Cut) & Vintage Textures are best friends
- Where to find Textures
- How to Convert photos into Textures
What You Need:
- Camera
- Illustrator/Photoshop/CorelDraw
- Laser Printer
- Flex-Soft (No-Cut)
Why use Vintage Effects
Trending t-shirt designs are t-shirts which are comfortable and relatable to people. And, these t-shirts are more than likely to have a design which feels soft to the touch, washes well and can handle our daily lives. Such t-shirts are born from designs which have lots of open areas with fine details built into the image itself.
All this is great to hear, but what if your designs are closed, have large blocks of colour and feel like plastic when pressed to the t-shirt? How can you take advantage of Flex-Soft (No-Cut) and vintage textures, when your t-shirt designs feel like plastic.
As a result, we created the Flex-Soft (No-Cut) Vintage Textures video. We want to open your eyes to the world of No-Cut solutions and its many possibilities and advantages. We have put together one of the most compact tutorial videos to date.
Your Imagination is the only Limitation
Understanding the advantages of our No-Cut solutions will make your designs more attractive to customers, which intern will increase your potential sales and ultimately your business profits.
More than anything, we want to show you exactly how soft you can make your t-shirt designs. Additionally, by adding a vintage t-shirt design texture to your designs, you will experience an increase with the washability of your designs and garments. As a result, saving you large amounts of toner. Additionaly, these savings will feed into your business profit margins.
Advantages of No-Cut Solutions:
- More Attractive T-Shirt Designs
- Keep up with T-Shirt Trends
- Increase Sales Potential
- Increase Business Profits


What Are Vintage Textures
Vintage Texture Effects can be described as being an image within an image. For example, an image or texture which has been cut out of your t-shirt design. That is to say, if you take your t-shirt design and the surface texture of wood. And, you put the wood texture over the top of your image and apply the correct photoshop filter. So, the wood effect is overlayed on your image. Now, imagine we cut the wood effect out of your image.
Finally, what you are left with is a vintage or distressed looking t-shirt design. One which is now open, soft to the touch and has a higher washability. Especially when compared to the same design without the vintage effect applied.
Advantages of using Vintage Textures in T-Shirt Designs:
- Less Expensive
- Lower Toner Costs
- Higher Washability
- More Attractive
- Higher Profits
- Softer Designs (Soft Hand)
- Lighter T-Shirt
- Increase Profits
- Less Plastic Feel
- Fashionable
- Trendy
Softer, More Durable & Washable
You can add effects or texture to any design. In fact, it doesn’t matter whether your image is vector or pixel based. With CorelDraw, Photoshop or Illustrator, you can convert your t-shirt designs from a hard plastic touch, expensive and problamatic images, into extremely light, soft, cost effective and profitable t-shirt designs.
These textures, in combination with our Flex-Soft (No-Cut), as well as our No-Cut solutions, will turn your once OK designs into fashionable, trending t-shirt designs. They will simply fly off the shelf.
Download 9 Free Washed & Worn T-Shirt Vintage Textures.
(external resources: Spoon Graphics)


The Perfect Companion
Flex-Soft (No-Cut) is one of the most advanced single-colour digital heat transfer papers on the market. With Flex-Soft (No-Cut), you can print any design that takes your fancy. Even the most complex Vintage T-shirt Design texture you can create.
From the finest of details, to rasterized portrait photos and the many vintage texture effects available. You can print the most detailed illustrations, sketches, photos or the most complex hand drawn type faces you can find. The design posssibilities are limitless with Flex-Soft (No-Cut).

Finest Details
One of the big issues with such fine detailed vintage images, is that, not everyone can do them. Of course, what we mean is that anyone can create them, but not everyone has the opportunity to print them. Not without investing large amounts of money upfront first. In the end, you may be left with the at least 70+ garments, all with the same design, that you need to sell before they’re no longer fashionable.
How can I create them, I hear you ask. Our Flex-Soft (No-Cut) transfer papers let you print the finest details, In fact, all our No-Cut transfer papers provide many advantages when printing fine detailed texture effects. In fact, all these advantages add up to helping you sell more trending t-shirt designs and run a successful t-shirt business.
Flex-Soft (No-Cut) Advantages:
- Finest Details
- Rasterized Images
- Single-Colour solution
- Multi-Layer Colour Combinations
- Vintage Effects
- Grunge Look
- Grafitti Style
- Distressed Look
- Damaged Effect
- Used-Look

How to Create Vintage Texture Effects for T-Shirt Designs
Step 1: Find Textures
Once you have found items in and around your home or office which you think will make for a good texture. Start taking pictures of each item. You can use your phone’s camera.
Firstly, before we start taking pictures of our texture items, we first need to make sure that we have good lighting. Making sure that we have good lighting, is the best things we can do to ensure we get the best photos possible. Additionally, good lighting will make sure that your textures stand out even more.
With your texture photos available, we can start preparing our textures. Secondly, open up your designs in your chosen image editing software. In this case, we used Adobe Illustrator.
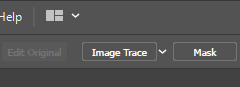
Finally, there is an option to convert your images into vectors. This option usually pops up in the top menu when you select your imported jpeg image. Alternatively, you can find this option under the “Object” menu in the top menu. You will see “Image Trace” in the sub-menu. Clicking this will begin the process of converting your image.


Step 2: Images to Vectors
After the conversion takes place, you should see many options available in the “Image Trace” panel. If you cannot find this panel, then your Image Trace Panel may not be active. You can find the Image Trace panel by clicking on Winow and Image Trace (Window > Image Trace).
Wait. Don’t click trace just yet. Depending on the lighting of your image, you may need to adjust the standard settings to get the best out of your textured photo. Use the Threshold slider to see where your texture looks best.
Note: Each image is different, so there is no standard options which can be used in this step of the process.
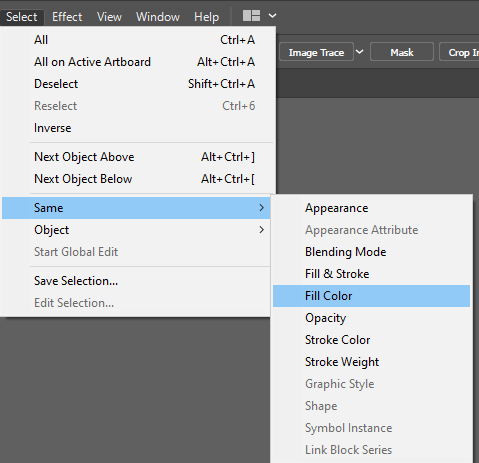
Now that we have our texture, we’ll need to remove the white parts from our image trace. To do this, we need to first ungroup the image. Next, click on one of the largest sections which contains white and then move up to the “Select” menu in the top bar. Here you need to choose the “Fill Color” option from the “Same” sub-menu.


Step 3: Texture Collection
After doing this, we can then go ahead and delete our selection. In the end, you can check that all the white areas of the texture have been removed, but moving the whole image to the side of your artboard or by simply turning your artboard off for a moment.
Now we have a vectorised version of our texture. Furthermore, if you have more texture photos which you would like to create, you can simply repeat the process above.
Finally, our textures are now ready to be applied to our hard and plastic looking t-shirt designs. Take a look at our next video in our series of vintage inspired tshirt design textures tutorials and video.

Conclusion
For more information on the different ways you can create t-shirt designs, please take a look at our other tutorials. Our tutorials are primarily focused on how to make your life easier, so you can create designs for heat transfer papers and B&W, Monochrome and CMYK laser printers.
Or sign up for the No-Cut Transfer Solutions Newsletter and we will send tutorials, tips & tricks and inspiration straight to your inbox.
You can learn more about our products over at our products page. We have a large range of products, which help you create and customise almost any garment or surface. Our goal is to help your business grow.
Leave a comment below. Let us know how your designs turned out and if you have any new topics which you would like to see, then please let us know too.

